Pages

Friday, May 27, 2011

Doughnut holes with Raspberry beer dipping sauce.


I had a beer themed party last week, well, more accurately, I tried to have a beer themed food party last week… which almost worked.. except it rained and most people at the party do not like beer.  Myself included…  It did not stop us from cooking go-with-beer kind of food and it certainly did not stop me from making a desert that included beer.
I often regress to my childhood on this blog, but I can’t help it.  For me, the most happy, sunny and cherished memories of childhood associate with comfort food.  What is more comforting and bad for you as doughnuts?  What you call doughnuts and back in the old country we called ‘Ponchiki”.
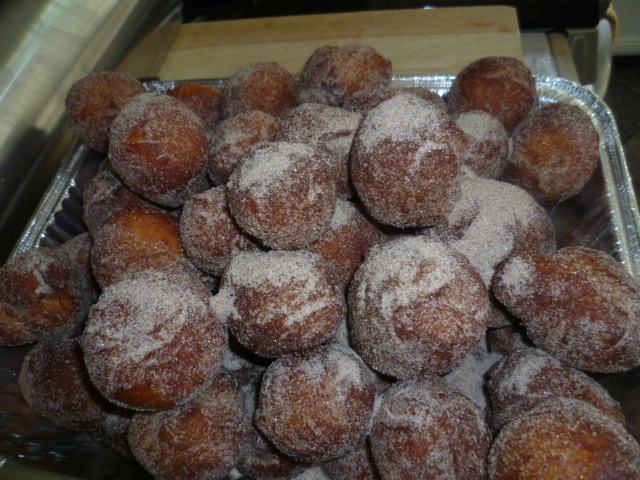
“Ponchiki” is a happy medium between a doughnut and a Zeppole.  If doughnut and zeppole run off and got married their child would be a gold ball sized, yeasted but light, soft, fried but not greasy, covered with powdered or cinnamon sugar… pure joy.  It is a bit lighter than a doughnut, bigger in size than a doughnut hole, but made out of yeasted dough unlike a zepple. 
So here is my version of doughnut holes or “Ponchiki” to bring out a kid in every one of us.  And the beer?  Where does the beer fit in?  “Ponchiki” can be served with a dipping sauce, chocolate or Crème anglaise.  I wanted something fruity and some place where I can incorporate a great Raspberry beer, which my husband buys for me.  In all honesty, it tastes nothing like beer, more like a great raspberry soda, but the bottle says beer, so I am sticking to my guns… Raspberry beer dipping sauce it is!
The recipe makes about 20 gold sized doughnut holes.  Feel free to double for a large crowd.
For the doughnuts:
3 – 3.5 cups of all purpose flour
6 tbs sugar
1.5 tbs of instant yeast
¾ cup of milk
2 eggs
6 tbs of butter at room temperature
½ tsp of salt
5-6 cups of peanut or vegetable oil for frying
½ cup of sugar and 1 tbs of Cinnamon for dusting.

For the sauce:
16 oz of raspberry beer
1 cup sugar
1 cup of frozen or fresh black currant or any other tart berries.

Make the dough.  Heat the milk to very warm temperature (make sure it is below 115F or you will kill the yeast), combine with sugar, salt and yeast and let stand a few minutes, allowing the milk to cool and yeast to activate.  In the stand-up mixer fit with paddle attachment, mix the milk and the eggs, add 3 cups of flour and mix well.  Switch to a dough hook and knead the dough for a few minutes, then begin adding butter one tablespoon at a time.  When all the butter is incorporated, evaluate your dough, does it look runny, of yes, add another ½ cup of flour.  Knead the dough for 5 – 7 minutes , cover and let rise in a warm place until double in size about 2 hrs.
In the mean time prepare the sauce.  Pure the berries in the food processor and strain out the seeds if you want ( I like to leave them in).  In the medium sauce pan, combine the beer, sugar and the berry pure and simmer until reduced to 1/3.  That is it, the dipping sauce is done.


To fry the doughnuts, heat up the oil to 350F and reduce the heat to med-low once the temperature is reached.  While the oil is heating up, dust your hands, and a cutting board with flour. Dip a ½ inch ice cream scoop into flour and scoop the dough.  Form a soft ball with your hands, taking care to treat the dough gently.  Place ready dough balls on a floured board.  You want to shape all your doughnut holes before frying, because once in the oil, things will happen very quickly and you will not have time to roll more holes, fry, turn and sugar dust at the same time…. Unless you have 8 arms like an octopus.


Once all your doughnut holes are shaped, drop 5 or 6 into the oil.  Don’t overcrowd the pan and try to keep the oil temperature at around 350F (a little less is ok).  Fry the holes until they are evenly golden on all sides.  Drain on paper towels and coat with Cinnamon sugar while they are still warm.


Serve with the raspberry beer sauce.  Some ice cream would not hurt either. Mine was Mango Orange blossom with blackberry swirl ( try saying that 10 times fast).


Thursday, May 19, 2011

Making Ravioli


I finally got to try out my new pasta machine.  Surprisingly the actual pasta dough making is fairly easy and I was afraid of it the most.  It’s making the ravioli all the same size, without a stamp, that’s hard… but like I said in the previous post, I have no patience for precision.
It was imagining tiny, cute raviolis, dough so thin you can see the filling through.  Reality was a little bit sloppier and messier, took more time than I thought, but not too shabby for the first try.  If I invest in a various sized ravioli stamps maybe I can even impress someone … someday.
I also realized that making of pastry dough, the kind than needs butter rolled in, folded, re-rolled, folded again… well you get the point, can be now done in minutes.  Once the initial slab of butter is incorporated by hand the laminating process can be done successfully on smaller batches of dough.  I will definitely try it.
Since the actual pasta dough came out beautify, I am giving the recipe below.  Not the pasta cutting and shaping… still need to work on that one.
Ravioli Pasta.
This makes a lot of 1.5 inch (average) raviolis, enough for 6 heaping portions.
3.5 cups of all purpose flour (see note)
4 eggs
1 tbs of olive oil
1 tbs of water
Note:   I use the all-purpose flour here instead of the mixture with semolina, which is traditional for past making.  Semolina flour can be incorporated as ½ of your four (by weight) if you planning on drying or freezing your pasta.


I find it easier using the food processor for the initial mix rather than starting the dough by hand.  Combine the flour, eggs and olive oil and pulse in the food processor until just combined.  Add water only if need for the dough to just come together.  It will look dry and crumbly and will begin to form a very loose ball.  (If your dough is forming a tight smooth ball, it may be a bit too wet.  You can incorporate more four while kneading by hand.)
Flour a wooden board and begin kneading the dough by hand.  I would stay away from the dough hook attachment on your mixer; pasta really likes to be hand kneaded.    The dough will be crumbly and dry at first, continue kneading until smooth and silky (at least 10 min).
Wrap in plastic and let rest in the fridge overnight or for at least a few hours.
When ready to make pasta, four the board again and knead the dough for a few minutes.  Then cut into 6 equal pieces and press through the pasta machine, beginning with the widest setting and ending on the lowest.  You will be left with paper thin sheets of dough that should be stretched out on a floured surface.  Now you can begin to fill and shape your pasta.  Just make sure that all your filled and sealed ravioli come out the same size.  It will insure even cooking times.


I did a simple stuffing of ricotta and pecorino and fresh herbs.  The pasta is so delicate that it only needs to be boiled for about 30 seconds before being finished in the sauce.  If your sauce is fairly thin, almost like a broth, you can cook the pasta directly in the sauce, without boiling it. 

How cool is this?


How the heck did they roll it this thin by hand for centuries?


Fill it

Here I am serving my uneven ravioli in a simple roasted tomatoes and mushroom ragu with a touch of cream sauce.  Delicious!


Sunday, May 15, 2011

Sourdough starter experiment - first try.


I am really terrible at anything requiring any type of precision.  Science and math was my most hated school subject as I never understood where in my adult life will I ever need to apply the knowledge.  How did I know that baking bread the old-fashioned way would require this much precision and calculation?  I wanted to try out natural starters for a long time now.  Baking bread with commercial instant yeast yields ok results.  The bread looks right, the texture is right but the taste is just not there.  For the real bread taste you need to cultivate your own starter and feed it, nurture it, grow it until you get the taste just right.  All serious professional bread bakers have their own starters.   I just never counted on the fact that nurturing their starters is their job, as for me it is only a little hobby.  Something I do in between my real job, kids, dogs and other real important things.
But back to math and science.  I got a little help from the professionals; I got a dehydrated starter, which is just some dough that has been made with decades (or centuries) old starter, that has been dried.  All you really need to do is re-hydrate it, feed it and there you go… Yeah, right!  The thing came with 40 pages worth of instructions.  After quickly scanning them (who really has time to read the instructions?) I felt totally intimidated, I was sure that my poor little fungi were doomed from my sheer incompetence.  So I went to the blogs…there must be other nuts out there that are playing around with these things and blogging about the experience.  After reading pages, upon pages of by volume measurements for feeding and sifting through numerous spreadsheets that supposed to calculate the exact flour to water ratios… I almost gave up.  Only the thought that people baked bread this way for centuries, long before literacy, blogs and spreadsheets kept me going.  Come on, if every un-educated housewife in the middle ages knew how to sustain a starter, how hard can it be? 
After feeding twice a day for a week, by site, not by volume measurement calculations I got the bubbling and the rise that looked like it could lift some dough.  So I decided to bake the first batch.  Big mistake,  the starters were too young, I screwed up the proportion of flour and although the bread rose nicely, it was a bit dense, but most importantly the flavor was there.  So my experiments were not entirely wasted.  I just need to continue cultivating the starters, measure a little more and learn a little patience… the virtue I am not know for….


Let it bask in the sunshine


After 3 days


First bake.


Not publishing any recipes now, I still need to play a bit more.  I have to get this right, I promised to make sourdough pretzels next week.

Monday, May 9, 2011

For the love of the dog and up-coming projects.


My heart sank last week when we found out our dog is seriously ill.  It was much unexpected as she is still so young.  Having lost pets before I know that this is a dreadful moment you need to consider before bringing home a puppy.  I also know that my life and family would never be complete without a family dog.  I think that it is the simplicity of our relationships with our pets that make it so difficult for us to cope with their loss. 
For now though, my dog is still alive and well.  You would think, someone forgot to tell her she is terminally ill, as she is running after her ball and lounges around in the backyard.  All we can do for now is making sure she eats well.  So now, I am not just cooking for the family and for the fun of it, I am cooking for the dog as well.  Having researched commercially produced dog food, I am not sure it is not the culprit of the illness in the first place.  We decided to try and give her the best possible end-of-life care, so for as long as she lasts, I will feed her what the dog food should really be made of.
And if you are a dog lover and are caring for a puppy or a sick dog, or just want to make your critter’s day, try the dog food recipe at the end of the post.  It is my version of the cure-all chicken soup for the dog.
On a happier note, I have a whole bunch of new food projects coming up, such as starting my natural sourdough bread cultures, which came with 40 pages worth of instructions ( God help me!) and trying out my new pasta machine.  The pasta machine was the only thing standing between me and absolute happiness, or so I thought.  I waited patiently for it to become available for over five months and now that it is finally here, I have not had a chance to try it out.   So in the next few weeks there should be a lot to write about, like home-made sourdough pretzels, grilled pizzas, pear and pecorino ravioli, all kinds of crazy burgers and raspberry beer glazed doughnuts.  The summer is only starting … the possibilities are endless.

Feel Good dog food

Makes about 5 cups (increase as needed)
1 lb ground chicken or beef
¼ lb chicken livers or other organ meat
1 cups of rice (uncooked)
2 cups of instant or quick cooking oats
1 medium carrot
1 small zucchini or squash
½ cup of peas
4 cups of water
In a large pot bring 4 cups of water to a boil.  Add meat and boil for 5 minutes.  Add rice and oats, stir, reduce heat to a simmer and cover.  Cook for about 15 minutes or until the rice is fully cooked and is beginning to fall apart, most of the water should be absorbed at this point.  This is not the case when you want a perfect consistency, al dente rice.  The mixture should be of a very thick soup at this point.
Add shredded carrot, zucchini and peas.   You can substitute with other vegetables, but stay away from anything having a high acid content such as tomatoes, eggplant, peppers, etc… 
Stir and cook for another minute.  No salt needed (the dogs do not even posses the ability to detect it).  No spices or flavoring is needed. 
Serve at room temperature.  Can be stored in the fridge.

A very satisfied and fed customer.