Pages

Wednesday, May 16, 2012

Rose wine rabbit ragout with Pancetta and Asparagus risotto

For somber reasons my Mother’s day was not all that great, never the less I was determined to make the best of it.  So even if I was not waited on hand and foot, I wanted to have a really nice meal.  Like really, really, really nice, something comforting, yet gourmet, something that you can find on the menu of a good restaurant.  Something, which is not often cooked at home (although I don’t know why).  So with the help of my trusted sous chef (daughter) and newly appointed kitchen “slave” (son), who takes out the garbage and keeps the dogs from hypnotizing me into stone ( they try it every time I walk into the kitchen) I set out to make my own Mother’s day meal.   
Rabbit may just be the underdog (no pun intended) of all proteins.  You will see it on the menu in some of the finer French restaurants, but it is not considered a mainstream ingredient and honestly I rarely find that it is cooked to my liking.  When I think of rabbit, I don’t think of fancy meals, it is a peasant game and should be treated as such.  The classic French rabbit stew calls for white or rose wine and lots of thyme to compliment the gaminess of the meat.  I needed something that would go well with the beautiful ragout sauce so I thought of risotto, which also gets bad reputations because it is considered hard to get right.  The only thing hard about risotto is keeping yourself from eating the whole pot.  If armed with patience and a few basic rules, the delight of risotto can be yours anytime you have 30 minutes.
 Most of the time, rabbit is sold hole and after taking all the meat off the carcass, you will be left with a lot of good bones.  I always prefer to make my own stock and hate to see perfectly good bones go to waste.  In this dish, I think it makes a world of difference.


Rose wine rabbit ragout.
2 lbs of rabbit meat on the bone (you can use the combination of thighs and tenderloin)
1 carrot chopped
1 small onion chopped
¾ cup of celery chopped
5 cloves of garlic chopped
1 lb of white button mushrooms sliced
2 tbs of butter
1.5 cups of apple brandy or cognac
3 cups of dry Rose wine (use a good quality French Rose that you would drink)
3 cups of rabbit stock (recipe follows) or chicken stock
10 thyme springs
¼ cup of heavy cream
Olive oil
Salt and Freshly ground black pepper

In a heavy bottomed pot or a Dutch oven, heat 3 tbs of olive oil.  Salt and Pepper the rabbit meat generously and brown in batches.  Set aside.  Add 1 tbs of olive oil if needed and add the mushrooms, lowering the heat slightly.  Brown the mushrooms and lower the heat to medium-low.  Add the butter, onions, celery, carrot and garlic.  Cook stirring often, until the vegetables are tender.  Deglaze the pan with brandy, scrapping the bottom.  Cook for a minute or two until most of the alcohol has evaporated.  Return the rabbit meat back to the pot, stir and add all the wine and stock.  The liquid should cover most of the meat.   Add a generous amount of black pepper and salt to taste. Top with all the thyme springs and bring to a boil.  Cover, reduce the heat and simmer for 2 hr or until the meat is very tender and is falling off the bone.
Take out all the rabbit meat, shred it with 2 forks and discard the bones and the thyme.  Strain the brazing liquid, discarding all the cooked vegetables.  Return the brazing liquid to the pot and reduce on high heat until reduced by half.  Add the cream, check for seasoning and let the mixture reduce for a few more minutes.  Add the shredded rabbit meat back into the sauce and let stand covered for a few minutes before serving.

Pancetta and Asparagus risotto.
1 lb of Arborio rice
½ pound of pancetta chopped fine (you can use bacon as well)
1 cup of chopped asparagus
1 tbs of olive oil
2 tbs of butter
1 cup of dry white wine
42 oz of rabbit stock (Recipe follows) you can use chicken stock as well – I find it hard to predict how much liquid your risotto will take on, so I prefer to have extra stock just in case.
¾ cup of grated parmesan cheese
½ cup of grated pecorino cheese
For the Gremolata:
½ cup of chopped parsley
Zest of ½ a lemon
Chop the parsley and the lemon zest together to incorporate the flavors better than just tossing together.

Have your stock simmering on low heat….except for the wine, which should be at room temperature, all the liquid going into the rice, should be hot, otherwise you will end up with an unevenly cooked risotto. In a large skillet heat the olive oil.  Add the pancetta and cook until crispy and all the fat have been rendered.  Lower the heat; add the butter and the asparagus.  Cook for only a few minutes, just so that the asparagus begins to soften, you do not want it to become too soft.  Set the pancetta and the asparagus mixture aside, leaving all the fat in the skillet.  Add the rice, stir to coat in the rendered fat and toast for a few minutes, until the rice begins to smell nutty.  Adjust the heat to medium, add the wine and stir using a wooden spoon.  Season with salt and pepper.  Stir until most of the liquid is absorbed, then begin adding stock, a few ladles at the time.  Stir slowly and make sure that most of the liquid is absorbed before adding more.  They say, it takes 22 minutes to cook a risotto, for me it takes anywhere between 25 and 30, for al dente.  Keep adding stock and stirring until the cornels are plum, rice looks creamy and the cornels are cooked but still have a bite to them.  A properly cooked risotto should not look stiff, but spread gently when plated.  When you are happy with the rice texture, stir in the cheeses and serve immediately.

To assemble the whole dish, plate the risotto, toping with the rabbit ragout and a few spoonful’s of the sauce (it will pool around the risotto on its own).  Garnish with the gremolata and serve immediately.

Rabbit stock.
Rabbit bones
Approximately 10 cups of water or whatever your large stock pot fits
2 tsp of tomato paste
1 small onion
1 carrot
2-3 ribs of celery
5 garlic cloves
Handful of parsley
3-4 thyme springs
1 bay leaf (fresh if you have it)
2 tbs of black or mixed peppercorns
Salt (I like to keep the salt in stocks to a minimum, allowing for proper seasoning later when used in sauce)
Preheat the oven to 450F.  Smear the tomato paste all over the rabbit carcasses, place on a baking sheet lined with aluminum foil and roast for 35-45 minutes until the bones are nicely browned.  Combine the bones, water and all of the ingredients in a large stock pot.  There is no need to peel or chop the vegetables as they will be discarded at the end anyway.   Bring to a boil and simmer on low, uncovered for 3 to 5 hrs (or until your patience runs out) skimming the shmutz of the top once in a while.  Strain the stock through a fine mesh.  Freeze in plastic containers if not using right away.


This was delicious!  Happy Mother’s day to me and to all of you Mothers out there!

Tuesday, May 15, 2012

Caprese salad with a twist.


It is the strawberry season and since I missed the picking last year, I decided to make up for it this time around.  I can’t help myself; I get caught up in the picking experience.  I can do it for hours, kneeling on the patch, stuffing my face with perfectly ripe, still hot from the sun strawberries, one for me… and one for the box… As always, I over picked, grossly….and even after making a batch of jam ( which I will post very soon) I have a lot of strawberries left, which means it is time to get creative.    This is the recipe inspired by one very similar in the “Around my French table” book.  Adding strawberries to a caprese salad seems strange as strawberries and tomatoes never cross seasons, so at least one of them would be less than stellar…but I got lucky, I happened on very good buffalo mozzarella, some very decent heirloom tomatoes (actually local but from a greenhouse), I just planted my own basil and could already spare a few leaves and of course the strawberries were perfect.   Try it, the combination is unusual but interesting, and makes a very good snack or an appetizer…

Strawberry Caprese salad.
Traditional Cparese salad is made with buffalo mozzarella but regular cow-milk fresh pulled cheese is good as well.  I also like mild goat cheese here for a very different twist…
Good quality, very ripe tomatoes cut into thick slices
Fresh buffalo mozzarella cut into slices
Fresh basil either chopped or torn
Fresh strawberries sliced
Lemon zest
Salt
Fresh Pepper
Extra Virgin olive oil

Toss the strawberries, lemon zest and half of black pepper, let stand a few minutes.  Assemble the salad by stacking tomatoes, mozzarella and basil.  Add strawberries on top of the basil.  Drizzle with olive oil and season with salt and black pepper.

Sunday, April 29, 2012

Mermaid Butter Cookies


I spent a lot of time in the kitchen when I was a kid.  Kitchen was the heart of our house and that’s where I remember my mother being the most.  My brightest and probably the fondest memory of her were probably when I was seven or eight year old.  It was a sunny, warm weekend morning in May.  The sun rays streaming through our huge open window bathing the spring onions and hot red peppers we had growing on our window seal.  The fresh cut lilacs swinging in the breeze filling our kitchen with pure spring fragrance.   My mother was making brunch.  She wore her “happy” bright orange house dress, with little ruffles around the sleeves, her than long blue-black hair dancing on her back.  She was making salad.  Simple salad of what was bought at the farmer’s market that morning, crisp new radishes, thin sprigs of young scallions and the first cucumbers of the season.    I can still hear the crisp strokes of her knife as she cut into the fresh produce.  I can still smell the cucumber sent, cool, clean, it filled our kitchen with unduplicated freshness.  I have not met that sent since…  Every time I walk out into my kitchen I try to duplicate that one perfect morning of simple joy of cooking with my mother and every time I pick up my knife she is there with me.
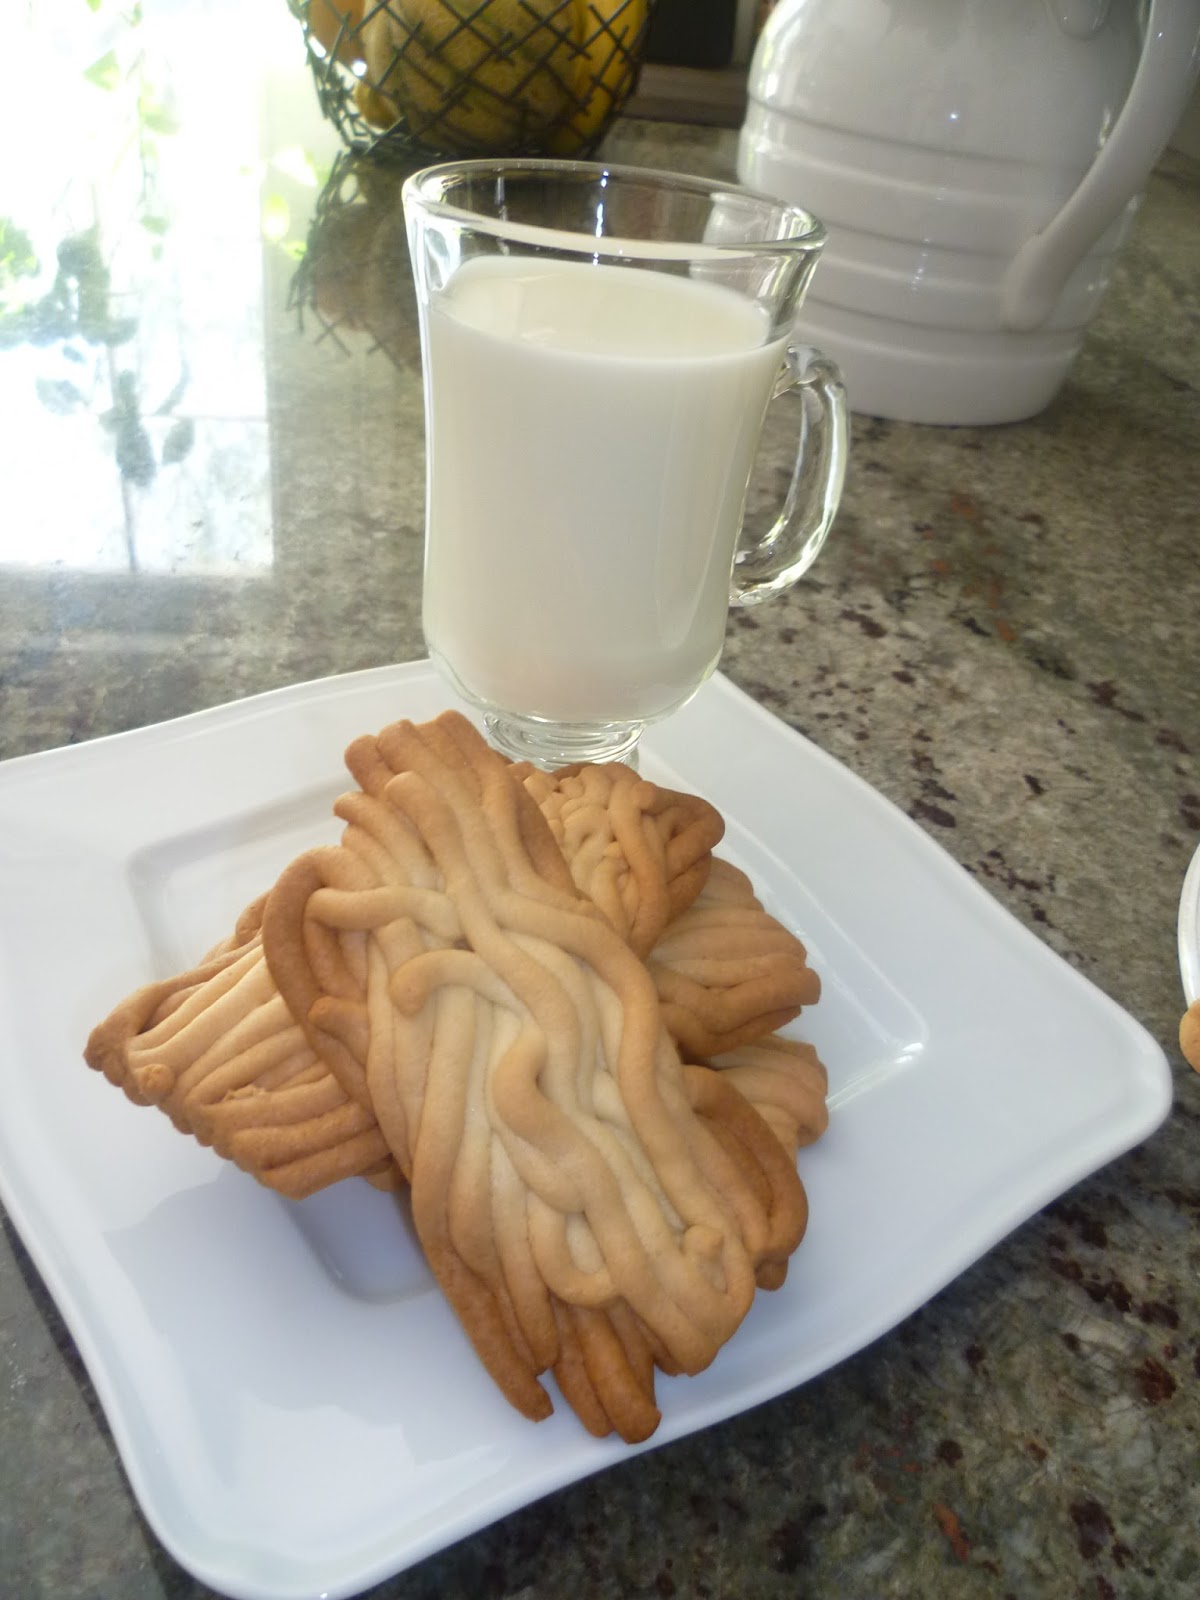
I like making things she used to make.  Her recipe notes are tucked away, mostly unreadable now.  I like holding them and try to make out her shorthand notes… she never meant for anyone but her to use them.  Tiny, fragile pieces of yellowed paper are all I have to go on except for my memories.  She had a lot of simple recipes for sweets, things that I could make with almost no help when I was little. I remember making these butter cookies, she called them “Mermaid cookies”, she said the waves of the dough reminded her of mermaids hair or waves of the ocean…  I never had a luxury as an adult of asking my mother for a recipe, but I like that some things, like these cookies, I can make from memory, as though she keeps guiding me.
A simple butter cookie is all that my husband needs to be happy…. I can bake my heart out, create complex cakes and tarts, bake macaroons and croissants, and he will still long for a simple butter cookie of his childhood.   We are a family of children at heart… each trying to recreate that one perfect long-ago moment….  A glass of milk and a dunking cookie is his idea of peace. 
This is not a fancy recipe, but the one that brings me and my husband back to our childhood.  It is the “everyday”  biscuit to bring a little whimsical comfort to our very grown up lives.
It is also the only cookie for which I give measurements in grams, as I learned to make it in the world where there were no ounces or cups.  I can of course re-calculate it to more common measurements, but I don’t want to.  I like keeping it old fashioned, after all, my mother did not use ounces….

Mermaid Cookies
550 Grams of all-purpose flour
300 grams of butter at room temperature
250 grams of sugar
2 eggs
1 tsp of baking powder
1 tsp vanilla extract
A pinch of salt

Cream the butter and the sugar until light and fluffy.  Add the vanilla and the eggs and mix on low speed until well incorporated.  You may need to scrape down the sides a few times


Combine the flour, salt and the baking powder.  Add the flour mixture to the butter mixture in 3 or 4 installments, mixing well.
Turn out the dough onto a floured surface and knead with your hands for a few minutes.  This will be very sticky dough with the crumbly edges.   Shape the dough into a disk and wrap in plastic and refrigerate for at least 3 hours or better overnight.  You want this dough to be very cold before shaping the cookies.  You can also freeze it for up to 1 month, just make sure it is wrapped up very well.

When ready to bake, preheat the oven to 375F.  Line 2 baking trays with parchment paper.   Using a meat grinder or a past cutting machine, feed the dough a little at a time.  You are looking for a collection of dough tubes. 


Cut the strands coming out of the machine with scissors, making the overall length of the cookies 2 to 2.5 inches long (you can make them shorter, but I like the dunking possibilities).
Bake for 25-30 minutes or until golden brown.  Cool on the cooling rack otherwise the bottoms get soggy.  Serve with a glass of milk or tea.

Think of your warm and fuzzy childhood day and dig in!


Thursday, April 19, 2012

Whole roasted Pmfrei with Kumquats and Chilies


Granted, when I ask my standard “How do you cook that?”, I sometimes get a perplexed look, but as soon as you convince them that you are not a psycho, people open up.  I have noticed that most people love to talk about food, especially if you seem sincerely interested in their ethnic cuisine.   Last week was not a waste, as I waited in line at the fish counter in an Asian supermarket, I saw an Indian woman buying a whole live cat fish.  She asked for it to be hacked into small byte size pieces and that sparked my interest.  Surely she was not going to fry it Southern style?  I asked what she intended to do with it, and after she got over the initial shock of a red-headed creature in sweats asking her stupid questions, she gave me a wonderful recipe for a traditional Indian fish stew with lentils ( I suspect it is a version of Daal but can’t be sure).  A few minutes later I saw a man ordering up some Milk fish, which I was eyeing, but new nothing off, so I asked.  I got another great recipe for this firm fleshed fish poached in coconut milk and spices.  I am thoroughly convinced that the best recipes do not come from cookbooks; they come from people whose moms and grandmothers made these dishes since the beginning of time.
Browsing the same Asian supermarket, I stumble onto some kumquats and some beautifully perfect hot peppers.  I can’t tell you what type of chili these were, because there are over 4000 types of chili peppers in the world, and these were labeled with hieroglyphs (which must have reflected the real name) and English translation of simply “Long Hot Peppers”…  Sometimes I think these English translations are meant to mock the average English speaking person… like if you don’t know what it is and cannot read whatever language, you have no business being in this store… not that I care.  I am adventures, I will try anything, once due to this bad labeling I ended up with a sauce that smelled like rotten eggs and decomposing flesh all at once… the label simply said “Vietnamese sauce for vegetables”.
So back to the peppers and kumquats, both looked so good that I bought them along with four large Pompano fish which I intended to roast.   The peppers, fruit and a few other ingredients looked so good and colorful together that I thought of roasting the fish using them all.  It is hard to ruin a whole roasted fish.  This dish came out phenomenal, the fish was scented with citrus, with a slight heat from the chilies and it looked beautiful.
Whole roasted Pompano with Kumquats and Chilies
4 Pompano fish, head and tail on, just gutted and cleaned
1 large yellow onion sliced thin
Handful of parsley  
Handful of cilantro
1 lemon sliced thin
1 lime sliced thin
A handful of kumquats sliced thin
1 or two hot red chili peppers sliced thin
1 inch knob of fresh ginger sliced thin
Olive oil
Sea salt and fresh ground pepper


Preheat the oven to 425F.  Line a baking sheet with sliced onions,
parsley and cilantro. 

Pre-slice all the components so that you are all set up to stuff the
 fish. 


Season each fish inside with salt and pepper and stuff with a slice of lemon, slice of lime, ginger, kumquats and chilies.


Drizzle the outside of the fish on both sides with a little olive oil, season with salt and pepper.  Place the fish on the bed of onions and herbs and scatter the remaining ingredients all over the baking sheet.


Bake for 20 minutes until the fish is cooked through and opaque.  I like to turn on the broiler for the last 3 minutes of cooking to crisp up the skin.  Serve whole.

Wednesday, April 11, 2012

Lemon Souffle

My daughter and I were watching an old episode of Chopped All-stars, where both Aaron Sanchezand and Geoffrey Zakarian were dueling in the battle of soufflés for the final desert round.  It dawned on me, that I don’t remember the last time I made a soufflé.  It is just not one of my “go to” dishes, savory or sweet, due to the fact that it has to be prepared while you are eating dinner and served immediately.  But I love soufflés, I miss them, it is like eating clouds (at least it is the way it should be).  And soufflés are not something to be afraid of, if a few basic rules are followed, they will always come out perfectly puffed, will not fall and are not hard to make.  And you can vary your ingredients and spices in thousands of ways, making this a very versatile dish.  Cheese soufflés for example can be the most decadent thing you ever eat.
As we were about to start cooking a simple Sunday supper and I had all ingredients on hand, I decided to teach my daughter how to make a soufflé.  She begged for chocolate of course, but after a long debate we settled on a good, old fashioned, lemon soufflé.  I like my soufflé “eggy”, preferably made with duck eggs ( these are richer and smoother than chicken eggs), but the duck eggs in my fridge were already reserved for making pasta, so I went with plain old chicken eggs. 
Soufflés came out beautiful, tall and puffy, with a hint of lemons and angel like softness and richness from the yolks.
Next time you are not in a rush and would like to impress someone with “It must be so hard to make!” desert, go for a soufflé… It works as comfort food as well.
Lemon Soufflé
Makes 4 soufflés
6 egg yolks.
9 egg whites
8 tbs plus 3 more of sugar
2 tbs of melted butter, cooled
2/3 cup of crème fresh
3 tbs of cake flour
Zest of 3 lemons
Juice of 1 lemon
1 tsp of lemon extract
¼ tsp cream of tartar
1 tbs of butter and castor sugar for the ramekins

A few basic soufflé making rules:
-          Most soufflés are baked at 375F
-          If baking individual soufflés they take 22 minutes  ( just like a risotto)
-          You should preheat a baking sheet which the ramekins will go on with the oven, this way, your soufflé gets a decent amount of heat from the bottom right away.
-          You should bake on the middle rack and there should be no other oven racks above your soufflés or they will not rise properly.
-          You can make the base ahead of time, but the whites must be incorporated right before you bake.
-          Don’t take your soufflé out of the oven right away.  Turn the oven off and let them cool for 3-5 minutes before taking them out.
-          If your soufflé doesn’t rise or falls (which shouldn’t happen if you follow the rules), just call it pudding and go on with your life… it will still be delicious.
Preheat the oven to 375F with a baking sheet inside.  Prepare the ramekins by buttering them (not too thick) and dusting the insides with castor sugar ( you can use regular granulated sugar as well).  Make the base.  Whip egg yolks with 8 tbs of sugar until pale yellow and ribbons appear on the surface.  Stir in the lemon zest, lemon juice and lemon extract.  Next stir in the melted butter and crème fresh. Sift the flour and gently stir it in, the mixture should be the consistency of smooth pancake batter, slightly runny is ok.
Whip the egg whites until frothy, then add the cream of tartar and continue beating until soft peaks appear.  Add the 3 tbs of sugar slowly, one at a time and continue beating until the peaks are firm and hold their shape.
Take half of the egg whites and fold them gently with a spatula into the base.  You want to work from the outside of the bowl, folding from the bottom.  Do not stir, or you will deflate the batter.
Fill your ramekins with the soufflé batter about 2/3.  Top each ramekin with a “hat” using the rest of the egg whites.  Smooth out the tops with a spatula. 
Bake for 22 minutes, until the soufflés have risen and the tops are golden brown.  Do not open the oven while baking, patience is a virtue.  Turn off the oven and let cool inside without opening the oven door for 3 to 5 minutes.  Serve immediately.


I imagine this is what angels eat! Pure clouds!